Table of Contents
Valid for Joomla 1.7/1.6
In order to complete the manual Joomla 2.5 installation, follow the steps listed below:
- Step 1:
Create a MySQL database from cPanel -> MySQL Databases and add a user. If you are not using cPanel, check the MySQL manual for more details on the database and user setup.
- Step 2:
Download the archive file with the latest stable version of Joomla 2.5 from the official website. Store it in a folder on your local computer and extract the archive.
- Step 3:
You can upload all the content from this local folder to the directory on the server where you’ll store Joomla 2.5. The easiest way to upload the files and folders is through an FTP client.
- Step 4:
Open the URL of the newly uploaded Joomla script. If the content is uploaded to the main web directory, use https://yourdomainname.com. In case you have uploaded it in a subdirectory, open https://yourdomainname.com/example. Then, replace the domain and the directory names with the corresponding ones for your website.
- Step 5:
The Joomla installation page will load.
There, you can select the language for the installation. It will be valid only during the installation. Once completed, Joomla will switch back to English.
To follow the next steps of the tutorial more easily, we recommend you choose “English.”
- Step 6:
On the next page, Joomla will check whether the server meets the system requirements. However, if one or more aren’t met, it will show a corresponding message.

- Step 7:
After you ensure all system requirements are met, click on the Next button in the top right menu. On the next page, you should read and accept Joomla’s license.
Again, click Next to continue.
- Step 8:
Here you have to enter the MySQL details for the new Joomla 2.5 installation. Use the ones set in Step 1.
In the following screenshot, you can find example entries and explanations for these fields:
- Step 9:
Next, you can set your File Transfer Protocol (FTP) configuration. Keep the default settings and click Next to proceed.
- Step 10:
On the current page, the main Joomla 2.5 configuration should be defined. Specify your site name, meta description, keywords, admin user, email, and password.
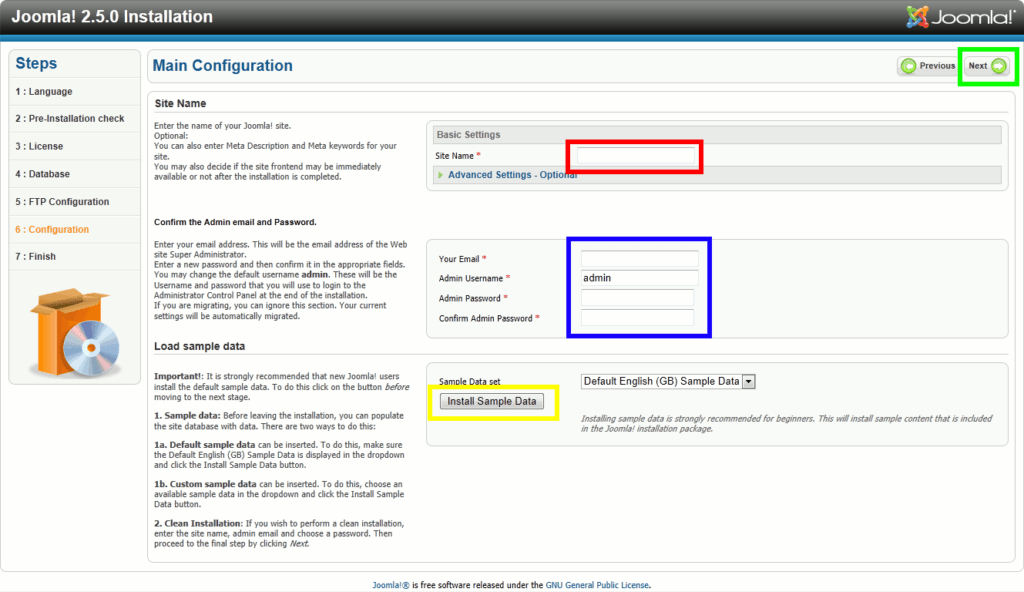
Click on Next to proceed.
Important: In this example, we will not use the Install Sample Data feature because it may cause confusion and require time to remove all the data populated later.
- Step 11:
On the last page of the installation wizard, you’ll receive a confirmation that Joomla 2.5 has been successfully installed.
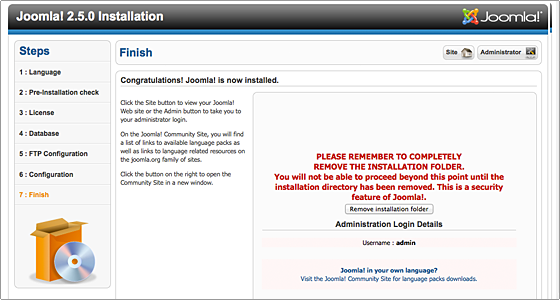
In order to access your new Joomla 2.5 website, you must delete the installation directory. This can be done with your FTP client.
Well done! Your Joomla website is now installed.
Please review our Joomla Web Development Work: https://www.metizsoft.com/work